
Snowman Print Bunting Tutorial
This snowman bunting is a wonderful craft
project for the whole family to enjoy together.
Visit Green Owl Art for the tutorial.
Cotton Ball Garland
This cotton ball garland at A Fanciful Twist is the
cutest! I love the touch of color amidst the cozy fluff.
Coffee Filter Paper Snowflakes
The Artful Parent shares the beautiful snowflakes
they made from coffee filters.
Shrink Plastic Snowflakes
The Long Thread shows you how to make a beautiful
snowflake shrink plastic necklace. These would also be
nice to add to a package or used in a winter diorama.

Go here to download.
Magnetic Snowman
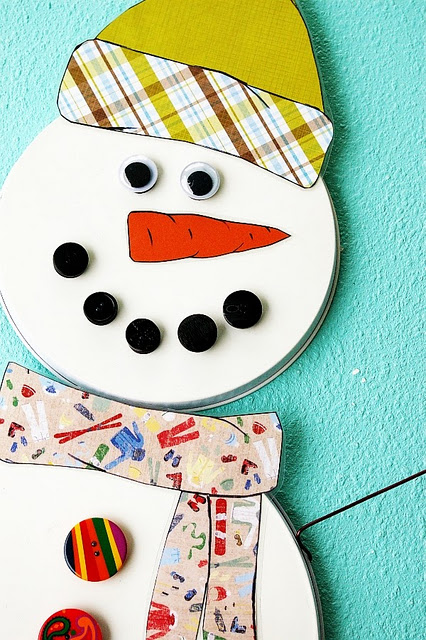 Use recycled burner covers to create this adorable magnetic snowman. The kids will love rearranging his “parts”! Get the fun tutorial over at Brassy Apple: Magnetic Snowman Tutorial.
![[DSCN4538[8].jpg]](https://blogger.googleusercontent.com/img/b/R29vZ2xl/AVvXsEh6ddQ4JPyHsZ1uJi8nxkRT4I1-1yEyfcNTmYML8JuYULR2rZaojdN9BrEocdZpq4DQY265InCJXYCCvqnY_e99ZjJxRsBGZGANdgAYacPnxD4Bj1NXNnS5qlMIRBRGOLZ3wPgI2sjMCnm9/s400/DSCN4538%5B8%5D.jpg)
This little guy is snow cute, he’ll ‘melt’ your heart. I’m sure with the holidays here, you’ve got some bottle caps lying around, or will soon have some. Make sure you save them so you can turn them into these little snowmen. Head on over to What I Live For for the tutorial. { Post found via UCreatewithKids}
Hot Cocoa Candle
by Nicole Blum, Photograph by Joe Polillio 

Get a jump on April Fool's with this yummy (looking) treat. A simple technique creates the whipped cream; brown dye gives the cocoa its luscious color.
Remember, never leave candles burning unattended or near unsupervised children.
Remember, never leave candles burning unattended or near unsupervised children.
- Materials
- 2 3/4 cups soy wax flakes pouring container or heatproof measuring cup with spout one third of a 3/4-ounce cube of brown wax dye 6-ounce glass mug made for hot beverages 9-inch-tall prewaxed wire wick with clip
- Instructions
- To make the cocoa:
Melt 1 3/4 cups of the soy wax flakes in a pouring container following these directions or in a heatproof measuring cup in the microwave according to the package directions. While the wax is melting, chop the dye into small pieces, then stir it into the wax. - Pour the wax into the mug and insert the wick. (If the wick tips, put a pencil across the top of the mug and lean the wick against it.) Let the candle cool, about 1 hour. The dye will lighten as the wax cools.
- To make the whipped cream:
Melt the remaining wax and let it cool until it's opaque, about 5 minutes. - Whip the wax with a fork until it begins to form frothy peaks. If the wax is too thin, wait a few minutes and try again. If it thickens too quickly, remelt it.
- Scoop the whipped wax onto the cocoa as shown. Let it cool, then trim the wick so that it extends 1/4 inch.
We know this isn't a craft but had to share this with you - WE LOVE IT!Snow Globe Cake
See how to make your own at Todera.
This adorable little snowman pencil topper seen at Turkey Feathers!
Pom Pom Snowman – How To


 To follow the step by step tutorial I found online pop over toSweetSimpleThings to find out what to do next.
Snowman Pop
 You Will Need:
- 1 lolly pop stick
- 3 mini powdered donuts
- 6 mini chocolate chips
- 1 candy corn
- 1 straw candy
- 2 M&M's or similar candy
Let your kids create, decorate and then enjoy!- Styrofoam balls
- Quilt or Craft Batting
- Colorfill "Diamond Vase Filler
- Tacky Glue
Directions:- Cut a circle from the batting large enough to wrap around your Styrofoam ball.
- Brush a generous amount of tacky glue on the Styrofoam ball
- Wrap the batting around the ball, trimming off any excess. Don't worry about making the batting perfectly smooth, as the imperfections will make your snowballs look more realistic.
- Allow to dry thoroughly.
- Pour Colorfill "Diamond" into a shallow bowl
- Brush generous amount of glue on the top of the batting.
- Dip the ball into the pellets and press to adhere them.
- Repeat until the entire ball is covered with pellets. Allow to dry overnight.
Check out our Previous PostsJan 18, 2011 ... Today we had a really awesome celebration of snow and winter. We love winter and all of our winter activities. So we decided to celebrate the ...www.blog.funandfactswithkids.comDec 26, 2010 ... It has started to snow like crazy here in the North East! The kids are so excited about thesnow and can't wait to go sledding. Labels: Snow and ...www.blog.funandfactswithkids.com- To make the cocoa:

Hi, Enjoy the article, I'm Manisha, I really want to say sincerely that this is amazing content that you have shared. thanks for this. it's really very helpful for me.
ReplyDeleteLive Current Affairs
Live Sarkari Naukri
How to get a Government Job easily
Facebook Video Download Online
Essay on Various Topics
HTML, CSS, Wordpress and More Tutorials