Loading

Sunday, July 24, 2011

Summer Crafts for Kids!

Summer Crafts For Kids

Mama Scout tin can lanterns
tin can lanterns
:: Mama Scout ::

Let The Children Play sidewalk chalk potions
chalk paint
:: Let The Children Play ::

Little Birdie Secrets rock necklaces
rock necklaces
:: Little Birdie Secrets ::

Honestly WTF friendship bracelets
friendship bracelets
:: Honestly WTF ::

Kleas bubble wands
bubble wands
:: Kleas ::

Imagine Childhood bows and arrows
bow and arrows
:: Imagine Childhood ::

Curly Birds no sew ribbon twirlers
no-sew ribbon twirlers
:: Curly Birds ::

Roots And Wings Co boondoggle
plastic lacing boondoggle
:: Roots And Wings Co. ::

Beneath The Rowan Tree fairy windchimes
fairy windchimes
:: Beneath The Rowan Tree ::

DIY Rope Bracelet

Posted by Erica on

Climbing ropeBracelets? Count us in. Inspired by Miansai‘s colorful, stackable and adjustable rope bracelets, we were determined to add another do-it-yourself bracelet to our growing collection. With some colorful rope and an S hook from the hardware store, making this bracelet is as simple as mastering the versatile sliding knot. We must warn you though, this project is extremely easy and addicting!
You’ll need:
- a little over 2 feet of 2mm accessory or utility cord (you can also use twine, mason line or any cord)
- a 7/8″ brass S hook
- a pair of pliers
- a lighter
Before you begin, seal the tips of the cord by burning them with a lighter. This will prevent the cord from fraying as you work. With a pair of flat nose pliers, squeeze one side of the S hook until it is completely closed. Do the same to the other side but leave just enough room for the cord to slip through. Thread 6 inches of cord through the closed side of the hook. Fold 3 inches of cord back on itself, creating a zig zag. Bend the last  2 inches of the cord over the zig zag. (Click images to enlarge)
Coil the cord twice around towards the left loop. Push the tip through the opening of the left loop. While pinching the tip with your left fingers, use your right fingers and push the coil to the left until the loop is closed and the knot is tight. Test the adjustable knot by sliding it towards the base of the S hook.
Repeat the same steps on the other side. This time, coiling towards the right side and pushing the coil in the same direction.
Trim and re-burn the tips if necessary. Your wrap bracelet is finished! It can be wrapped around the wrist 2-3 times and adjusted with the sliding knots.
Try making the bracelets with leather cord too. Have fun!
(top image from here

Cousin's Day

 "What's buzzin cuzzin?"
Of course we have to blog about a day like today since we, Kristen & Wendy are cousins!


In kinship terminology, a cousin is a relative with whom one shares one or more common ancestors. The term is rarely used when referring to a relative in one’s immediate family where there is a more specific term to describe the relationship (e.g., one’s parents, siblings and descendants). The term “blood relative” can be used synonymously and establishes the existence of a genetic link. A system of “degrees” and “removals” is used to describe the relationship between the two cousins and the ancestor they have in common.
The “degree” (first, second, third cousin, etc.) indicates one less than the minimum number of generations between both cousins and the nearest common ancestor. For example, a person with whom one shares a grandparent (but not a parent) is a first cousin; someone with whom one shares a great-grandparent (but not a grandparent or a parent) is a second cousin; and someone with whom one shares a great-great-grandparent (but not a great-grandparent, grandparent or parent) is a third cousin; and so on.
The “removal” (once removed, twice removed, etc.) indicates the number of generations, if any, between the two cousins. The child of a first cousin is a “first cousin once removed” because the one generation gap represents one “removal”. The child is still considered first cousin, as the grandparent (the child’s great-grandparent), is the most recent common ancestor and thus represents one “degree”.
Non-genealogical usage often eliminates the degrees and removals, and refers to people with common ancestors merely as “cousins” or “distant cousins”. The system can handle kinships going back any number of generations (subject to the genealogical information being available).
Celebrating today, should be nothing but fun. Get together with your cousins. Hang out, just chill, or do anything you want to do...... as long as its a fun time spent with your cousins. 

Wednesday, July 13, 2011

National French Fry Day

Sorry, the blog post below is from last year!  We have been so busy enjoying our summer that we completely forgot to celebrate this with the kids this year! ---- we won't tell them if you don't :)  haha

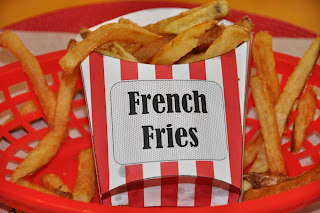
These DIY paper fry holders are super to make and we just fell in love with them!!  (the pattern is available below)

Ok, who doesn’t like French fries, chips, pommes frites, freedom fries, French-fried potatoes… no matter what you call them or how you cook ‘em (deep fried, oven baked, pan fried)? No one we know that’s for sure. The history of the French fry varies depending on who you ask. My favorite explanation is that the Belgians invented them. They date them back to the 1600’s. During the winter, when the river was frozen they could not fish so they cut up potatoes and ate those fried in oil instead. During World War I soldiers tasted the fried potatoes and called them French because at that time it was the official language of the Belgian Army.

Here are two good sites to read about the history of a French fry HERE at Official French Fries and HERE
These our actual paper fry holders we made for the kids!

So in the tradition of Fun and Facts with Kids, can you guess what we are going to do? You guess it, we are making our own French Fries. Of course the kids are going to have a blast not only eating them but making them too!

You can always:

If you have a favorite French Fries stop that you have been avoiding, now is the day to stop by and indulge in a large! Where are your favorite fry places? Wendy's? McDonald's? Red Robin? Feel free to comment on where your favorite places to get fries are!


Make your own Deep Fried Fries. Buy a large (or a couple) baking potatoe(s) and slice up into strips, depending on the thickness you like. Dry on paper towels while heating up some oil in your deep fryer to 350 and fry for 4-5 minutes or until desired crispiness. Drain on paper towels and season with salt.

Make your own oven baked fries. Use a baking potato or whatever your favorite kind of potato. Slice up into wedges or strips and toss in a bowl with olive oil. Spread out onto a baking sheet and sprinkle on some salt (or some johnny's). and bake at 450 degrees F for 15-20 minutes, stirring fries once when they star getting crisp.

Or to make it really simple, use a bag of store bought french fries, your favorite cut, and deep fry them or spread them on a baking sheet and drizzle with some olive oil and bake until desired crispiness.


THE FOOD:
French Fries of course!  Below is the recipe we will be trying this year. We like the idea of baking these treats instead of deep frying them.  We always love it when we can make it healthier for the kids!


THE CRAFT:
We will place our French fries in paper fry holders. We found the DIY paper template online. We printed it out on Red and White Striped Scrapbook paper and then cut and folded it to shape.  


You can find step by step and the template for two mini’s HERE and a large size to print out HERE


FREEBIES:
We found adorable Culinary Art Fonts. You can download from HERE  Below is an example of some of the fonts: (the end one is pizza that I cut off by accident)


Thursday, July 07, 2011

Chocolate with kids!

Today is National Chocolate Day!  
Did you know that chocolate actually comes from trees? It's true! This small tree is called Theobroma cacao, or the cocoa tree. Its fruit produces cocoa seeds, from which cocoa powder and chocolate are made. If only chocolate bars grew on trees!
If you're a chocoholic, then you have two more chocolate days to celebrate! World Chocolate Day is on September 4 and National Chocolate Day is on October 28.
Today, take the time to enjoy this favorite treat. Whether it’s in the form of a bar, syrup or ice cream—the choice is yours! Today is also National Strawberry Sundae Day so maybe you pour the chocolate all over your sundae :)  Oh yeah - JULY is also National Ice Cream Month!!!

If you ever wondered how is chocolate made or where does chocolate come from, then this page will help you discover the answers plus share a few chocolate facts and easy chocolate recipes. 


The information below is brought to you by http://www.kids-cooking-activities.com  

How Chocolate is Made

Where does chocolate come from?

To learn how is chocolate made first, you'll never believe what the chocolate that we enjoy today looks like from the beginning.  It all begins south of the equator in large pods that grow on the cacao tree. 

From the halls of Montezuma Ancient Mesoamerican civilizations used to give the cacao tree an important place in society. The Mayans and the Aztecs used to use cocoa beans as currency. Crushed cocoa beans were used to make a bitter liquid called xocoatl. Only royalty and the best military warriors could gain access to the drink. It wasn’t until European settlers came to South America and Africa that the cocoa bean made its way to the modern world. 

Even though that was a few hundred years ago, the process of prepping the cocoa bean for chocolate manufacturing remains pretty much the same.  Cacao trees produce large fruit pods on the trunk of the tree. The pods are harvested with machetes. When you crack them open, you’ll find about fifty or more seeds within a sweet pulp. 
cocoa bean plant
Young cocoa bean plant                                           cocoa bean plant open with cocoa beansHow is chocolate made starts with these cocoa beans inside a cocoa fruit.

How is chocolate made from cocoa beans?

The pulp and the cocoa beans are removed and placed in buckets for fermentation. Depending on the type of cacao tree and the manufacturer, the process can take a week or longer. 

Fermentation gives the beans some semblance of the chocolate taste we like. Once the fermentation process is complete, the cocoa beans are spread out so that they can dry naturally in the sun. 

It is the dried beans that are shipped to chocolate manufacturers all over the world. Once there, the beans are roasted, much like coffee beans. Roasting intensifies the final taste of the chocolate. When the beans are ready, the shells are then removed. What you are left with is the essence of the bean – cocoa butter and other chocolate solids. Now, how is chocolate made from this, read on.

new roasted cocoa beans
Roasted Cocoa Beans

A machine grounds the shelled beans into a paste that is referred to as chocolate liquor even though it is not a liquid or contains alcohol. From here, it is a magical process, if you will, that varies from manufacturer to manufacturer. 

Even though some of the ingredients are trade secrets, the process is quite similar. The chocolate paste goes through a machine that removes the cocoa butter. This leaves you with a powdery cocoa. Substances like cocoa butter (re-added), sugar, milk, oil and the like are added to reconstitute the powder into chocolate. The last step in chocolate making is conching. 

The chocolate is mixed in a large machine until it is the consistency the manufacturer likes. After, the chocolate is poured into molds, allowed to cool, wrapped up and then packaged for shipment. 

How is Chocolate Made from Cocoa Beans Video


Chocolate in many shapes and sizes

  • Semisweet morsels –These are perfect for chocolate chip cookies or any type of add ins in baking.
    • Semisweet chocolate bricks – This is baking chocolate. It can be cut up and melted for chocolate candy, chocolate cakes and icings.
      • Unsweetened dark chocolate bars – Unsweetened chocolate is used for recipes that call for other sweet ingredients like sugar or honey to offset the bitter taste. Many unsweetened dark chocolate bars don’t contain anything but cocoa solids so they are safe for those with food allergies.
        • Dark chocolate or milk chocolate bars – With or without the nuts or fruit pieces, these are great for eating. Milk chocolate is creamy but the added milk also adds calories and fat. Depending on the chocolate manufacturer, you may get a different taste with each brand you try.
          • Cocoa powder – This is where the chocolate begins as a presscake once the cocoa butter is removed. The presscake can then be packaged as cocoa powder for hot chocolate and also for baking. Unsweetened baking cocoa is best for recipes. Hot chocolate has other dried ingredients added like sugar and dehydrated marshmallows. It is just for drinking.

          Easy Chocolate Recipes

          Now that we've answered the question, how is chocolate made, create some easy chocolate recipes.

          Step by Step demonstration on how to make Chocolate from Cocoa Beans:
          http://www.wikihow.com/Make-Chocolate

          Making Chocolate from Cocoa Powder:
          or 

          Making Chocolate Video:
          This is the list of ingredients used in the above video:
          Ingredients: 
          125g vegetable shortening (Copha or solidified coconut oil works fine)
          125g confectioner's sugar (pure icing sugar)
          6 tablespoons cocoa powder (good quality)
          4 tablespoons powdered milk (full cream)
          Pinch of salt

          Chocolate Educational Resources:

          All these incredible lesson plans and resources below are from - http://www.fmnh.org/chocolate/

          Cocoa Connections: From Beans to Bars - A Resource Kit for Educators contains 12 lessons—six lessons on chocolate and the environment and six lessons on chocolate and culture—that will increase your students’ understanding of the connections between humans and their environment. Each lesson outlines learning objectives, a list of materials needed, and instructional activities. The full curriculum also includes extension activities, an overview of the Chocolate exhibition, a suggested reading and film list, and classroom-friendly recipes.

          Student activity sheets for each unit are provided in both English and Spanish. A hard copy of the curriculum is also available when you borrow The Story of Chocolate exhibit case from Harris Loan center. For more information on this case, download the Resources for Educators section listed below or call 312.665.7555 to speak with the registrar.

          Using chocolate as a framework, students can:

          Discover the botanical source of chocolate,Theobroma cacao, a small tree of the tropical rainforest interior;

          Explore the ecological connections between people, plants, insects, and other animals within the tree’s habitat;

          Investigate cultural interactions and conservation concerns resulting from the cultivation, processing, exchange, and consumption of cacao and other foods; and

          Recognize the changing economic and cultural roles of cacao and chocolate in local and global economies over time.


          To 
          Download* and print the Coaoa Connections: From Beans to Bars - A Resource Kit for EducatorsCurriculum you will need will need Acrobat Reader
          Download Introduction:
          Overview, Table of Contents, Exhibition Overview and Chocolate Introduction

          Download Chocolate and its Environment lessons:


          • Lesson 1: Where does the story of chocolate begin? (864K)


          • Lesson 2: What is the anatomy of a cacao tree and how is it cultivated?


          • Lesson 3: What other natural products are connected to chocolate?

          • Lesson 4: What are the connections within the cacao ecosystem and how are they being threatened?

          • Lesson 5: How is cacao harvested and fermented? (960K)


          Download Chocolate and Culture lessons:


          • Lesson 1: Who grows cacao and how does it affect their lives?


          • Lesson 2: How did the Maya and Aztec use chocolate?


          • Lesson 3: How did the Europeans use and influence the development of chocolate?

          • Lesson 4: How did the technological advances of the past century affect the use and future of chocolate?


          • Lesson 6: How has chocolate changed through the ages?


          Download Resource Materials:


          Educators' Resources
          Design Element

          FREE printable worksheets and coloring pages - http://www.abcteach.com/directory/theme_units/chocolate/


          Sunday, July 03, 2011

          Build a Scarecrow Day!


          Build a Scarecrow Day!
          Scarecrows are a big hit in decorating during the fall, and are associated with harvest scenes. But, scarecrows are built to stand out in the garden to scare crows and other birds away. The crops are out growing in the field during the summer months. So, if you're going to build a scarecrow for your garden, the time is now.  Hence, a July date.       

          Definition of a scarecrow
          That which frightens or is intended to frighten without doing physical harm.  Literally that which - scares away crows, hence the name scarecrow.

          Everything about Scarecrows
          Scarecrows have been in our history for centuries.  The first finding about scarecrows were back in the 1500's and even back to the ancient times of the Romans and Greeks when putting what they called harvest Gods out to watch over the fields was the norm.  People from Japan even made scarecrows out of oily material and fish bones and attached it to tall wooden stakes to help protect their rice fields.  So as you can see, putting scarecrows on stakes has long been in practice for many years and in many different countries.

          Scarecrows first started out
          as a means for farmers to protect their crops and gardens from the harm that birds such and the crow, could do.  Birds could do a lot of damage by eating up the fruits, vegetables and grains that the farmers had planted therefore a means had to be invented to help the crops.  So the Scarecrow was invented!

          The scarecrow had a purpose
          and an important one back in the old days.  In this day and time the scarecrow is not only used in our gardens for a practical purpose but it is put there for the whimsical and fun look that it gives our gardens. The scarecrows rough and ragged appearance can be fun and funny or it can be scary in hopes of protecting our food that's growing in our gardens.  The Scarecrow is one of the most familiar figures not only in the United States but throughout Europe and many other countries of the world.  The scarecrow has worldwide popularity.

          How to build a scarecrow


          DLTK's Holiday Crafts for Kids
          Scarecrow Paper Craft

          In case you can't build a real scarecrow you can have the kids make a paper one!
          This little scarecrow is simple to make and comes in two sizes.  The largest one is easier to cut out but makes a big scarecrow (you'll have to clear room on your fridge to hang him).


          Materials:

          paper

          printer

          something to color with (B&W version)

          scissors

          glue


          Instructions:

          • Print out the template of choice (you can mix and match the B&W and color versions if you want less coloring).  You need all 4 templates to make a large scarecrow.
              
          • Color the template pieces (if using the B&W version) -- feel free to use different materials for coloring to add creativity/personality to the project (paint, markers, pencils and crayons are all fun choices)
              
          • Cut out the template pieces (young children may need help with this step)
              
          • Glue the scarecrow together:
            • Glue the neck ruffle to the body, right where the dotted line on the body stops.
            • Glue the head onto the body right above the neck ruffle
            • Glue the hat onto the back of the head
            • Glue the hair onto the head, overlapping the hat a little
            • Glue the arms onto either side of the body
            • Glue the hands/mittens onto the ends of the arms
            • Glue the legs underneath of the body so the feet are sticking out
            • Glue the patches onto the body
            • Glue the buttons onto the body
            • Glue the sunflower and the crow on to decorate (I put the sunflower on the hat and the crow on one arm, but you can get creative if you like)
                 

          Printing the Template:

          • Close the template window after printing to return to this screen.
                            
          • Set page margins to zero if you have trouble fitting the template on one page (FILE, PAGE SETUP or FILE, PRINTER SETUP in most browsers).


          SMALL scarecrow template     color   or    B&W


          BIG scarecrow template #1     color   or    B&W

          BIG scarecrow template #2     color   or    B&W

          BIG scarecrow template #3     color   or    B&W

          BIG scarecrow template #4     color   or    B&W


          Printable version of these instructions


          Event Calendar